Resource Record
Updated 04-10-2026
Spec staff only
The following are sections and fields a processor must fill out in order to have a complete Resource Record in ArchivesSpace. Use the information from your Collection Description document to help fill out fields.
Log into ArchivesSpace (AS) & Create a Resource Record
- URL: https://uidaho.libraryhost.com/.
- The username and password are established upon account creation.
- Create a Resource Record
- Option 1:
- If the collection has a previous Accession Record, find it by searching in ArchivesSpace.
- When found click “view” to view the record. Once at the record viewer window, in upper right hand corner select Spawn.
- Click on Resource.
- This will create a Resource Record using some of the information filled from the Accession Record.
- Option 2:
- In ArchivesSpace, click Create located next to the search box.
- From the drop-down menu, click Resource.
- This is typical for older collections without existing records in ArchivesSpace.
- Option 1:
Basic Information Fields
The fields listed below should be filled for each resource record. Please consult with department colleagues if questions arise.
| Field | Required | Content | Examples |
|---|---|---|---|
| Title | Yes | The title will likely be the same unique name given to the donation. The name of the person/group + type of records, such as papers, records, or collection. | Joe Vandal papers |
| Identifier | Yes | Assign the identifier based on the next available number in the List of All Collections. If you have questions about the difference between MGs, UGs, and PGs, see the Scope of Collections documentation. | |
| Level of Description | Yes | Drop-down menu. Usually Collection. | |
| Resource Type | Optional | Drop-down menu. Best practice is to select the type even if this field isn’t required in AS. Selections are Collection, Publications, Records and Papers. | University of Idaho photograph collection; Joe Vandal papers; Sunshine Mine Company records |
| Publish? | No | Do not check. | |
| Restrictions Apply? | Optional | Check if there are restrictions. | |
| Repository Processing Note | Optional | Not included in any reports or exports. Include additional processing information. |
Languages
The fields listed below should be filled for each resource record. Please consult with department colleagues if questions arise.
| Field | Required | Content | Examples |
|---|---|---|---|
| Language | Yes | The language term and code represented in the material(s) described. Default is English. | English |
| Script | Yes | The script term and code represented in the material(s) described. Default is Latin. | Latin |
Dates
The Dates section in the Resource Record is used to document the dates of the materials in the accession. Include both bulk and inclusive dates when appropriate. May already be filled in if spawned from Accession Record. Please consult with department colleagues if questions arise.
| Field | Required | Content | Examples |
|---|---|---|---|
| Label | Yes | Select what the date type is from this drop-down menu. Generally, Creation is selected. Consult a colleague if you think it should be something different. | Creation; Modified; Digitized |
| Expression | Yes | This field shows the dates that are visible in the accession record. More descriptive information can be included in this field, such as circa. If date unknown, type “undated” | 1942-1987; circa 1985; 05 June 1947 |
| Type | Yes | Select inclusive, bulk dates, or single from drop-down menu. If date unknown, select single. | Inclusive = dates encompass whole collection; Bulk = majority of materials are between two dates; Single = for material that only covers one date |
| Begin Date | Yes | First date in date range (yyyy-mm-dd). If unknown leave blank. | May 25, 1947 would be 1947-05-25 |
| End Date | Yes | Last date in date range (yyyy-mm-dd). If unknown leave blank. Not needed if date is single. | Last known date is 1987, so type 1987. |
| Certainty | Optional | Are these circa dates? If so, choose ‘Approximate.’ If not leave blank. If date is unknown leave blank. |
Era and Calendar autopopulate as CE and Gregorian respectively, generally no need to adjust.
Extents
The Extents section in the Resource Record refers to the size of the collection (usually # of cubic feet, i.e. # of storage boxes). May already be filled in if spawned from an Accession Record.
| Field | Required | Content | Examples |
|---|---|---|---|
| Portion | Yes | Normally, Whole is chosen because it describes entire collection. However, Part can be chosen is there are varying extents. If you are portioning in parts, you’ll need to add new sections for each portion using the “+” at the bottom of the section. | Physical or born-digital collection without variations = Whole; Hybrid collection with analog materials in boxes and assets on a USB drive = 2 Part sections |
| Number | Yes | The numeric value of the extent. | Physical collection = Whole, 5 (cubic feet); Hybrid collection = Part, 2 (c.f.) & Part, 15 (megabytes) |
| Type | Yes | How the space is being accounted for. For digital collections it may be Megabytes, Gigabytes, or Terabytes. | Physical collection = Whole, 5, cubic feet; Born-Digital collection = Whole, 5, gigabytes |
| Container Summary | Optional | Use this field to track number of boxes and as a guide to see if boxes are missing from a shelf. | 4 folders, 1 box |
| Physical Details | Optional | Other physical details of the materials described. | Analog; b&w; negatives |
| Dimensions | Optional | Dimensions of the materials described. | 29 cm; 7 in. |
Finding Aid Data
The Finding Aid Data section in the Resource Record houses finding aid creation information.
| Field | Required | Content | Examples |
|---|---|---|---|
| EAD ID | Yes | This is based on the ID. The formula is NTD+ID. | MG 571 would have an EAD ID of NTDMG571. |
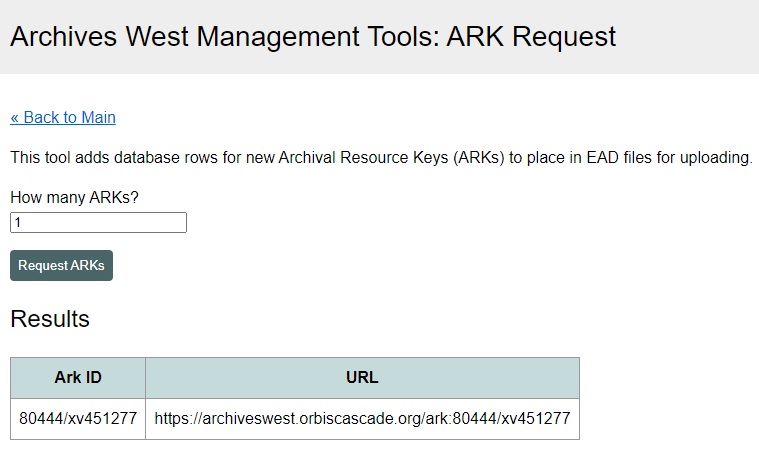
| EAD Location | Yes | Retrieve from Archives West Management Tools site by clicking ARK Request, and requesting an ARK number. | 80444/xv147063 |
| Field | Required | Content | Examples |
|---|---|---|---|
| Finding Aid Title | Yes | Guide to [Collection Title] | Guide to University of Idaho photograph collection |
| Finding Aid Subtitle | Optional | Not required or used often. | |
| Finding Aid Filing Title | Yes | Usually just the collection title. If a title with a person’s name, the format is Last Name (First and Middle). | Vandal (Jane J.) papers |
| Finding Aid Date | Yes | Year the finding aid was completed. If a finding aid was updated, note the date of update in the Finding Aid Author field. | 2037 |
| Finding Aid Author | Yes | Finding Aid prepared by [name of person who prepared the finding aid] | Finding aid prepared by Jane Vandal; Finding aid prepared by Jane Vandal, updated by Joe Vandal in 2035. |
| Description Rules | Yes | Autopopulates as Describing Archives: A Content Standard (DACS) | |
| Language of Description | Yes | Usually English. Include all languages found in the finding aid. | English; Spanish |
| Script of Description | Yes | Usually Latin. | |
| Language of Description Note | Yes | Finding aid written in [whatever the language it is written in.] | Finding aid written in English. |
| Sponsor | Optional | If work on the collection is funded through a grant or other sponsor, make note of that. | Funding for encoding this finding aid was provided through a grant awarded by the National Endowment for the Humanities. |
| Edition Statement | Optional | For recording information about the edition of the finding aid. | |
| Series Statement | Optional | Indicates any bibliographic series to which the finding aid belongs. | |
| Finding Aid Status | Yes | When ready to upload to Archives West, mark as Complete. In Progress can be used while collection is still being processed. |
Related Accessions
The Related Accessions section in the Resource Record is sed for linking associated Accessions with the Resource. If collection was spawned from an accession, that accession will appear automatically. Any other accessions will need to be linked.
To link an accession:
- Click Add Related Accession.
- In the search bar, type in the accession id OR select Browse from the drop-down menu.
- Once accession found, select to link.
Multiple accessions can be added.

Agent Links
The Agent Links associates the creator of the material with the record. It also links the source of material or subject of the materials described to provide information about their context.
To link an agent:
- Click Add Agent Link.
- In the Role dropdown menu select either Creator, Source, or Subject.
- The Relator section narrows down the specifics of the creator, source, or subject. If unknown, skip.
- In the Agents search bar, type in the entity you are trying to link.
- If agent not found by searching, from the dropdown select Browse.
- If agent not found in the system at all, hover over Create and select the type of agent you are linking.
Creating an Agent
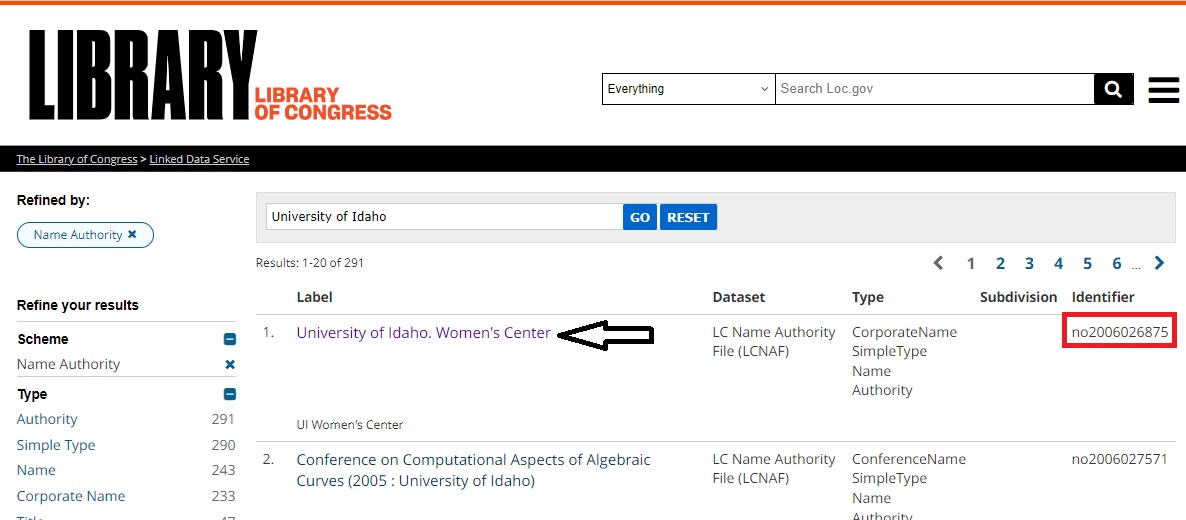
- Search the Library of Congress Name Authority File (LCNAF) database to see if your agent has a LCNAF record.
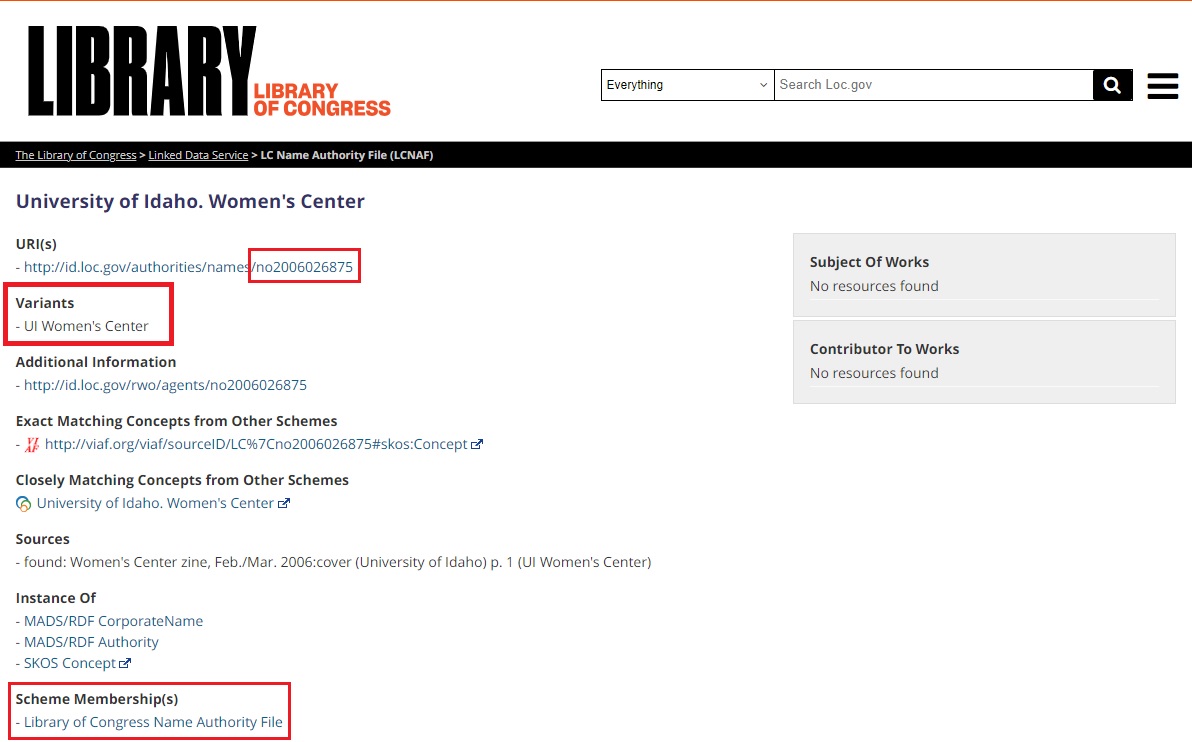
- If correct agent record populates, click on to view the full record.
- This page will show accepted variants and the LCNAF Identifier (at the end of the URI link).
- Use this information to fill out the fields when creating an agent in ArchivesSpace.
- If correct agent record populates, click on to view the full record.
Example:
- After hovering over Create and selecting the type of agent you are linking:
- The Create Agent window pops up. Check the Publish? box. Then scroll to the Name Forms section.
- Fill in the following fields:
| Field | Required | Content | Examples |
|---|---|---|---|
| Authority ID | Yes (if known) | This is the LCNAF Identifier. | no2006026875 |
| Source | Yes | Select correct source from dropdown menu. | If from LCNAF, select Library of Congress Name Authority File. If source unknown, select Unspecific ingested source. |
| Rules | Yes | Information can be inferred from Source. | Usually select Describing Archives: A Content Standard. |
| Name Order | Yes | Autopopulates as Indirect. Usually leave as is. | |
| Prefix | Optional | If there is a name prefix, include here. | Mrs. |
| Title | Optional | If title is part of a name, add here. | Sir (for Churchill, Winston, Sir, 1874-1965) |
| Primary Part of Name | Yes | Usually last name or surname of a person. | Churchill (for Churchill, Winston, Sir, 1874-1965) |
| Rest of Name | Yes (if known) | Include the rest of the entity’s name. | Winston (for Churchill, Winston, Sir, 1874-1965) |
| Suffix | Optional | Term following a name that qualifies the name but is not a title. | Jr. |
| Fuller Form | Optional | The fuller form of first and middle names, when abbreviated. | Hilda Doolittle (for H.D., Hilda Doolittle, 1886-1961) |
| Number | Optional | A number, sometimes with a term, that qualifies the name. | II (for John Paul II) |
| Dates | Optional | Dates of existence for the named entity (i.e. birth and death year) | 1886-1961 (for H.D., Hilda Doolittle, 1886-1961) |
- Leave the rest of the fields blank, and click the blue Create and Link to Agent button. Process is complete.
NOTE: Multiple agent links can be added.
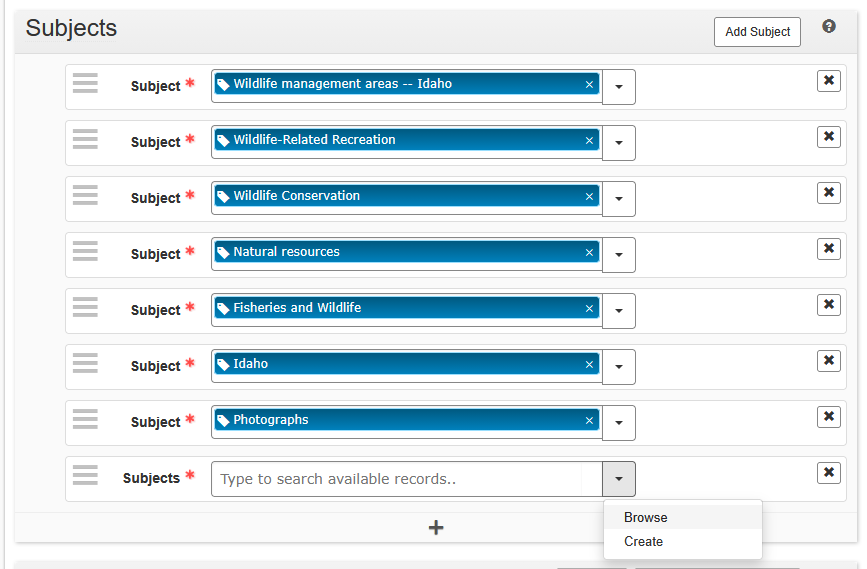
Subjects
The Subjects section in the Resource Record is used for linking Subjects with the materials described.
To add a subject:
- Click Add Subject.
- In the Subjects search bar:
- Type to search for a subject already in ArchivesSpace
- Use the dropdown menu to Browse for subjects.
- Use the dropdown menu to Create a subject.
NOTE: Names are generally not Subjects. Add names in Agent Links field.
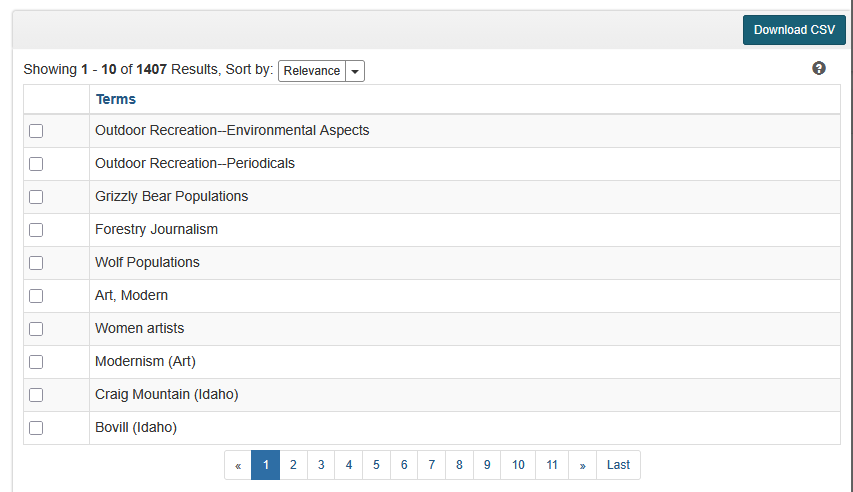
Creating a Subject
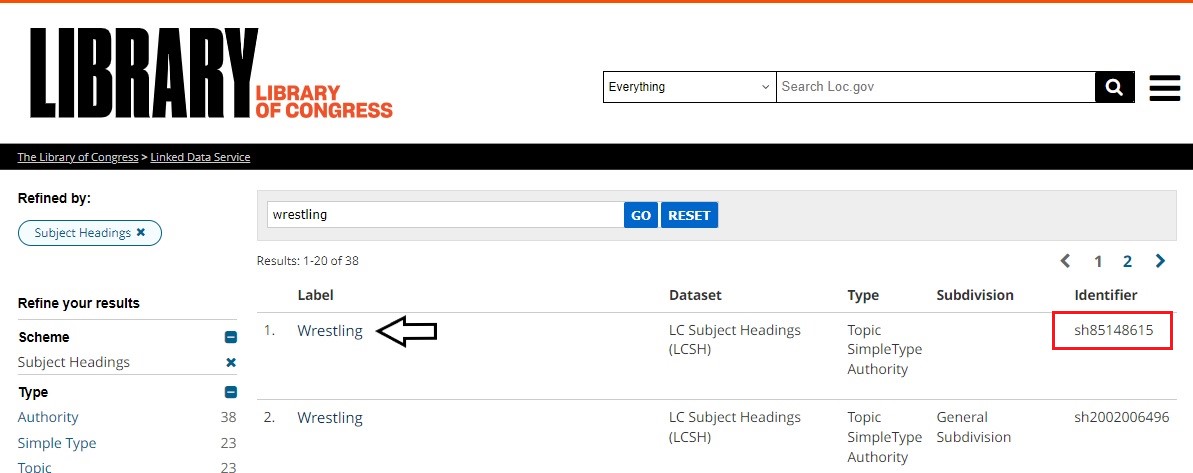
- Search the Library of Congress Subject Headings (LCSH) database to see if a subject has a LCSH record.
- If correct subject record populates, click on to view the full record.
- This page will show accepted variants and the LCSH Identifier (at the end of the URI link).
- Use this information to fill out the fields when creating an agent in ArchivesSpace.
- If correct subject record populates, click on to view the full record.
Example:
- After clicking Create, the Create Subject window pops up.
- Fill in the following fields:
| Field | Required | Content | Examples |
|---|---|---|---|
| Authority ID | Yes (if known) | This is the LCSH Identifier. | sh85148615 |
| Source | Yes | Select correct source from dropdown menu. | If from LCSH, select Library of Congress Subject Headings. If source unknown, select Unspecific ingested source. |
| Scope Note | Optional | Usually left blank. Explains what is meant/not meant in the definition of the term and in its use as a subject heading. | |
| Term | Yes | Type in the term. | Wrestling |
| Type | Yes | Usually Topical, Geographical, or Uniform Title. Choose the correct type from the dropdown menu. |
- Leave the rest of the sections blank, and click the blue Create and Link to Subject button. Process is complete.
NOTE: Be sure to add three or more subjects. One MUST be a subject by Archives West. Consult colleagues for more information.
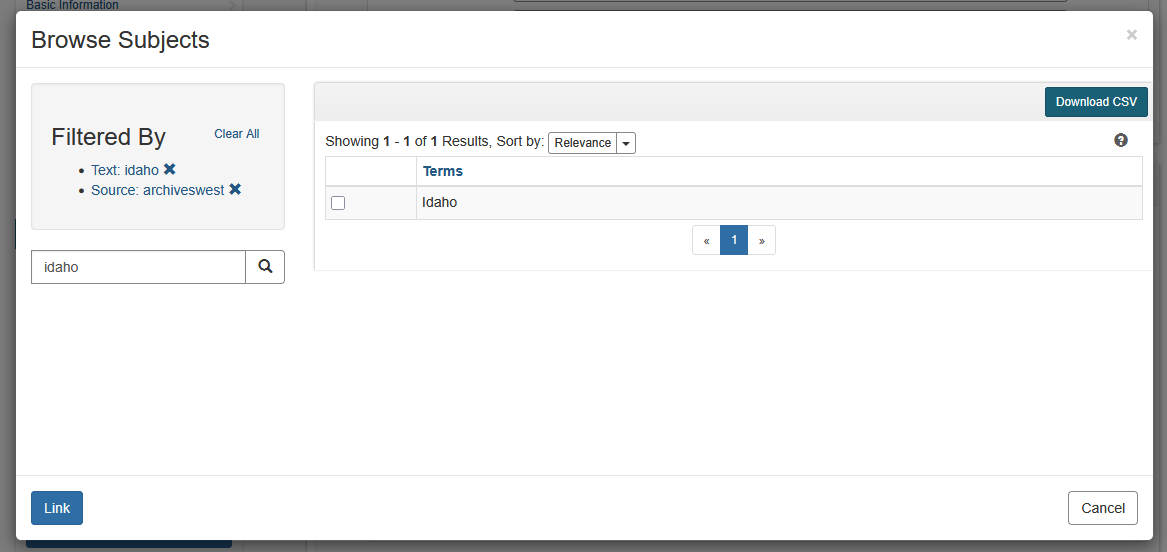
Typically “Idaho” is used. You can find this using Browse:
Enter “Idaho” into the Filter by text box in the upper left corner.
In the Source list on the left, select the option from archiveswest. This will leave you with one result to choose.
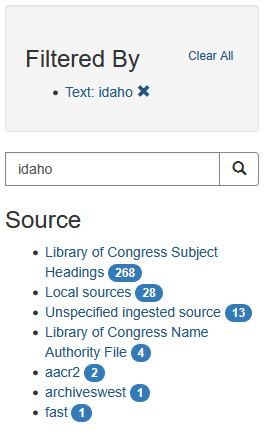
Click “Link” to add this subject to your resource record.
Notes
This section adds descriptive information about the materials, usually in the form of text or structured lists. Use the information from your Collection Description document to help fill out fields. If collection has been spawned from an Accession, some notes will autopopulate.
To add a note:
- Click Add Note.
- Begin adding Note Types from the dropdown menu. Add as many as you can to provide researchers with as much collection information as possible.
- To link webpages, copy and paste the following, adding in your URL (link) and the text (words or link) you want to be clickable:
<extref linktype="simple" title="webpage" show="new" href="PASTE LINK HERE" actuate="onrequest">WORDS OR LINK</extref>.
- To link webpages, copy and paste the following, adding in your URL (link) and the text (words or link) you want to be clickable:
Below are fields usually filled out by processors.
| Note Type | Required | Content | Example |
|---|---|---|---|
| Abstract | Yes | 2-3 sentence description of the collection. Will serve as the Summary section on Archives West. | Records, pictures, and other miscellaneous papers from the University of Idaho Press. |
| Arrangement | Yes | Include whether the collection has retained its original order, or if there was archivist intervention. Describe reasoning for intervention. | Original order retained. OR The original order of this born-digital collection was retained during ingestion. During the processing stage archivists reorganized folders and filenames in order to allow easier integrated into a single system of arrangement. |
| Bibliography | Optional | Include a bibliography if outside research done and compiled to complete the Biographical/Historical Note. To include a clickable link, see Clickable Links in AS & AW. | |
| Biographical / Historical | Yes | Include historical context or biographical context about the collection. See Composing a Collection Description to help fill out this field. | |
| Conditions Governing Access | Yes | Inform researchers about accessing physical and digital materials. | Collection is open for research. |
| Conditions Governing Use | Optional (if restricted materials) | Identify any restrictions on reproduction due to copyright or other reasons, as well as restrictions on further use of the materials being described, such as publication, after access has been provided. | Consult Head of Special Collections and Archives on permissions for use. |
| Existence and Locations of Copies | Optional | Used to distinguish when a duplicate of an item is an access copy made by the Archives. | The access files of the digital materials in this collection are located on the archive drive. Contact University of Idaho Library Special Collections and Archives for access or questions. |
| Existence and Locations of Originals | Optional | If the location of originals is known, provide information about the existence, location, and availability. | The original digital files are located on a floppy disk located within the collection. OR *This collection is found in the Small Manuscripts area of Special Collections. |
| File Plan | Optional | Include if there was a file plan during the processing. | |
| General | Optional | Include other information regarding the collection or the processing procedures. If the collection contains offensive content, include a General note and fill in the language under Standard Language>Resource Records in the Offensive Material Practices section. | |
| Immediate Source of Acquisition | Yes (if known) | Include donor information (i.e. name and date) and/or how the collection came to Spec. | The materials in this collection were donated by Joe Vandal in 2023. |
| Physical Characteristics and Technical Requirements | Optional | Note important physical characteristics of the collection. Note whether there are technology requirements to view certain materials. | Please note this collection contains electronic pdfs and will require a PDF viewer software. |
| Preferred Citation | Yes | See Citations documentation. Copy into this field. | |
| Processing Information | Optional | Brief description of actions taken during processing that have an impact on the use or content of the collection (unusual arrangement, sampling techniques used, etc.). | Digital materials were processed by Jane Vandal in 2023. |
| Related Materials | Optional | If there are other collections with materials relating to important subjects in the collection you are describing, include information about those collections. Use links to hyperlink ArchivesWest finding aids. To include a clickable link, see Clickable Links in AS & AW | Related materials may be found in [Photo/Manu/Uni] Group [Number] [Collection Name]. |
| Scope and Contents | Yes | The type of records included in the collection as well as the topics or subjects covered in those records. | This collection contains photographs and memorabilia kept by Joe Vandal. Joe was a U of I alum and active member of the Vandal community. Much of the material focuses on making a Jane Vandal mascot. |
| Separated Materials | Optional | Note whether some materials were separated and place into other collections. | The books in this collection were separated and added to the Day-NW Book Collection held by Special Collections and Archives. |
Uploading ArchivesSpace Spreadsheet
To upload a completed spreadsheet:
- In ArchivesSpace, search for the correct Resource Record and click the Edit button (right of the record title and date range)

- Click Load Via Spreadsheet.
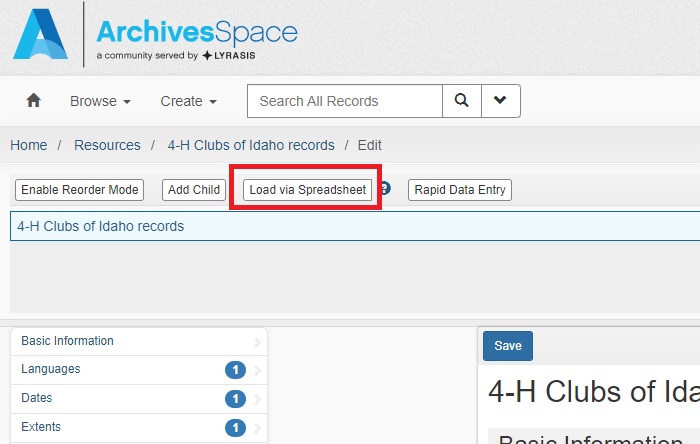
- Click Select File and find the spreadsheet you created.
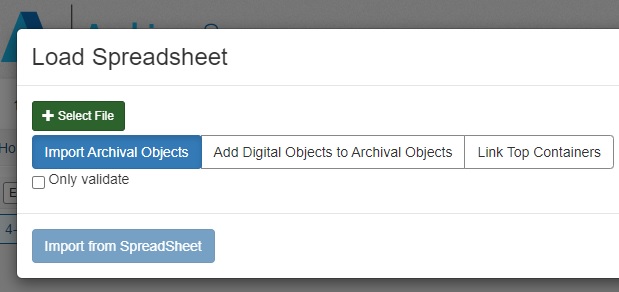
- Click Import from Spreadsheet. A new browser window will pop up as the spreadsheet and information gets loaded in.
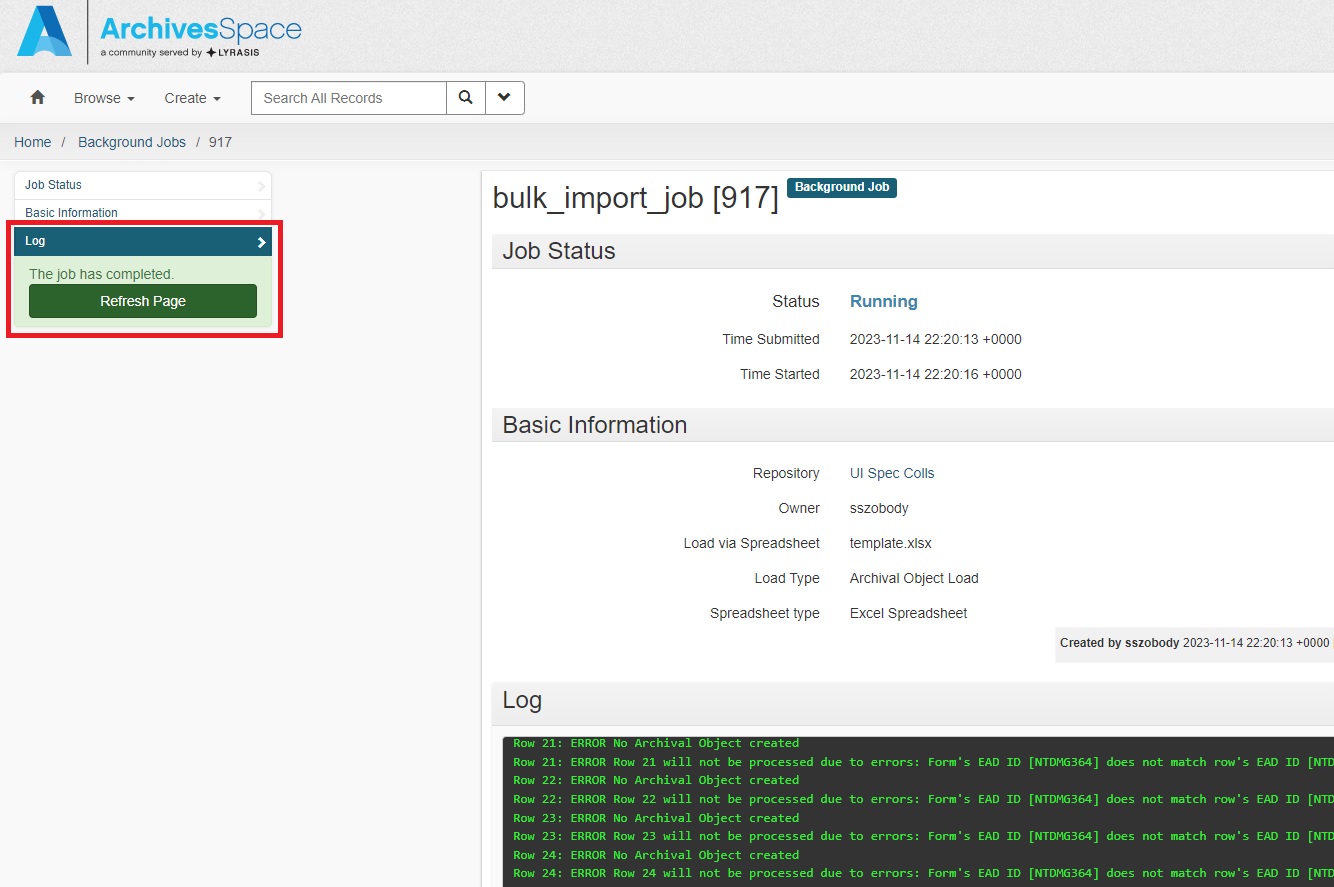
- Here is where you will see whether the spreadsheet has any errors. If import has no errors, click Refresh Page then exit the import browser window. If errors occur, consult a colleague.
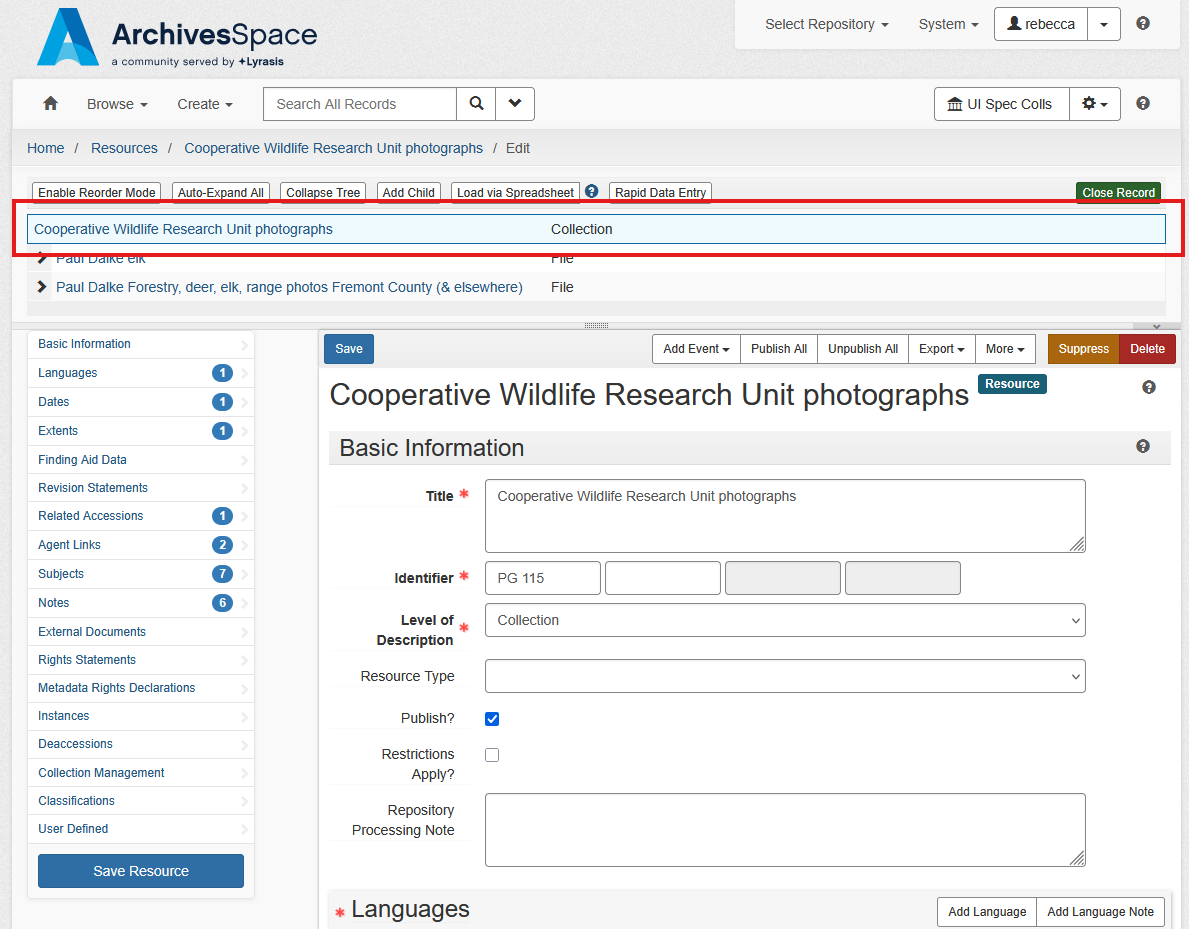
- The browse that has the Load Spreadsheet window still open. On the right hand side click Close.
- The Series, Sub-Series, and Items from the spreadsheet should populate.
NOTE: If issues occur, consult colleagues or use the Orbis Cascade Help Form.
Instances
The Resource Record must be saved before container lists can be added. A container instance is the location of where the collection is housed in archival storage.
To add an instance:
- Scroll to Instances in Resource Record. Click on Add Container Instance (right side of screen).
- Under Type select the appropriate field that represents what the materials are.
- Best practice is to select Mixed Materials.
- Top Container is the Box level. Click the drop down arrow, and select Create.
- The Create Top Container window will pop up. Fill out the Container Type and Indicator.
- from the Container Type dropdown menu, usually select Box.
- Indicator is a usually a number.
- Example: Box (Container Type); 1 (Indicator). It will read in the Resource Record as: Box 1.
- Click the blue Create and Link to Top Container button.
- The Create Top Container window will pop up. Fill out the Container Type and Indicator.
- Select the correct Child Type from the dropdown.
- If the Top Container is a box, the best practice is to select Folder from this list (other forms from these options are acceptable.)
- Child Indicator is again a numerical value.
- Example: Folder (Child Type); 54 (Child Indicator). It will read in the Resource Record as: Folder 54.
- Continue these steps until all container instances in the collection are entered.
- Save the Resource.
- To add locations, see Labeling and Shelving.
Manual Entry
Small collections can be filled in manually in ArchivesSpace (as can individual lines).
- After all descriptive fields have been entered, you can begin adding folders and items. Navigate to the top level (Collection line) of the Resource Record.
- Select “Edit”
- Click “Add Child”
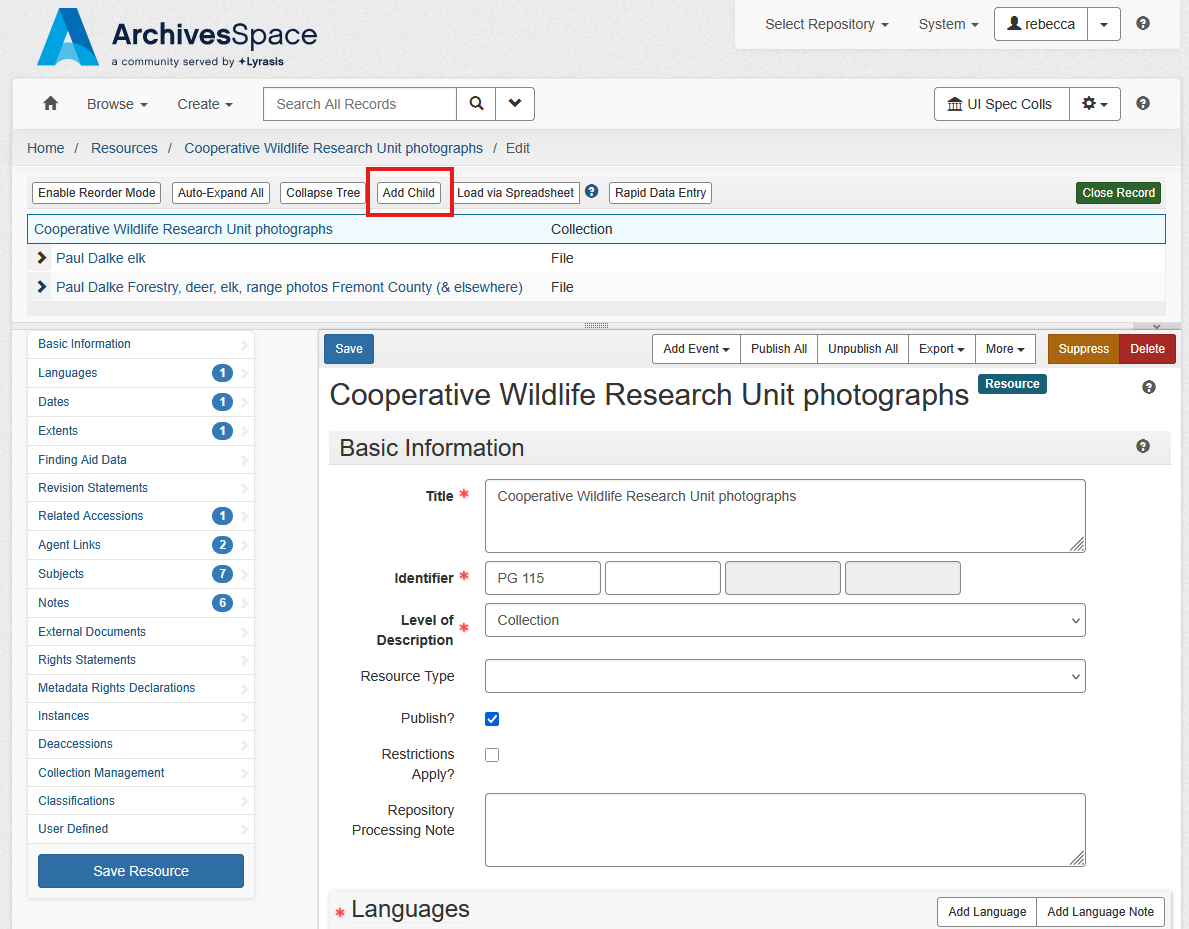
- A new screen will appear with fields to fill in:
- Title: Name of the folder, series, or item.
- Level of Description: Series, Subseries, or File.
- Dates:
- Date Expression
- Type
- Begin Date
- End Date
- Certainty (optional)
- Extent
- Number
- Items
- Notes
- Physical Description (what the material is)
- Instances: Box, Folder, and/or Object