Accession Record
04-10-2026
The following is based on the Accessions Manual created by Ashlyn Velte in 2018 and subsequently updated by Amy Thompson in 2019 and 2022. It was again updated in 2023 by Dulce Kersting-Lark.
NOTE: For acquisitions 1 cubic foot or smaller, Spec employees should attempt to complete accessioning and processing as soon as possible, except for accessions that are tied to a larger group of accessions or an existing processed collection. (June 2026)
Log into ArchivesSpace (AS)
- URL: https://uidaho.libraryhost.com/.
- The username and password are established upon account creation.
Create an Accession Record
- In ArchivesSpace, click Create located next to the search box.
- From the drop-down menu, click Accessions.
NOTE: ArchivesSpace requires only 3 fields to create an accession record: Title, Identifier, and Accession Date. However, it’s important to add as much information as you can. You can save a record at any point. You can leave and come back to a record, but be sure to click the blue save button at the top of the record or at the bottom of the left-hand menu.
Basic Information Fields
The fields listed below should be filled for each accession record. Please consult with department colleagues if questions arise.
| Field | Required | Content | Examples |
|---|---|---|---|
| Title | Yes | Some version of the donor, campus department, or creator name combined with papers/records/collection/photographs. The naming rules are based on Describing Archives: A Content Standard (DACS) guideline. | The President’s Office records; Civilian Conservation Corp (CCC) photographs; John Osborn collection; Leonard Feather papers |
| Identifier | Yes | Use AccessionIDs spreadsheet (in Sharepoint) to find the next available UA, MA, or IJC identifier | English Dept. records = UA; Gary Williams, English prof. = MA; Community group corporate records = MA; USB of photographs from dept. on campus = UA |
| Publish? | Don’t check | ||
| Content Description | Yes | Note what is in the accession. Be sure to mention if there are any external storage devices such as CDs, DVDs, zip drives, etc. | 3 CDs of photographs of plants found on the U of I campus; 4 boxes of records and various other papers |
| Condition Description | Optional | Describe any condition issues you see with the collection (tears, rips, dirt etc.). | Three damaged boxes. |
| Disposition | Optional | Note whether materials were separated | Photographs were separated and made into a PG collection. |
| Inventory | Optional | Note if and where an inventory is. If Sharepoint, use the file path. Digital copies of the inventory should go in the appropriate UA/MA/IJC Inventory folder. If there is a paper inventory, place in correct accession binder. If it is in a box within the collection, note where and make a copy to be placed in the accession binder. | /spec/Collections/Accessions/MA Inventories/MA 2011-26 Molina Collection Inventory |
| Provenance | Yes | Donor name or other information about chain of custody. Paper records of donor information also go in accession binder. | Joe Vandal gave it to Jane Vandal who gave it to Spec; Jane Vandal emailed the materials in 2035. |
| Retention Rule | Optional | Note any specific retention requirements. | Retention ends 2025; Materials not chosen to be kept are marked for discard according to the Deed of Gift. |
| General Note | Optional | Describe anything else that should be known about this collection. Describe any actions already taken on the collection related to basic organization. Identify materials that need additional appraisal. | These materials were sent via email; This is an ongoing/living accession; More donations to be added to this in the coming months. |
| Acquisition Type | Yes | Dropdown menu includes: Deposit, Gift, Purchase or Transfer. | Transfer = from a campus unit and is a UA; Gift = if it has a donor; Deposit = rarely used (for something loaned to us); Purchase = materials we bought. |
| Resource Type | Yes | Dropdown menu includes: collection, papers, publications, or records. | Records = corporate records/campus unit records; Papers = personal papers; Publications = books/periodicals; Collection = mixed type |
| Language of Description | Optional | Note the language of the materials (can be multiple). English is default. | Spanish |
| Script of Description | Optional | Choose appropriate type. Latin is default. | Latin |
| Restrictions Apply? | Optional | Check if there are known restrictions | |
| Access Restrictions? | Optional | Checking marks it as yes. Leave blank if no. | |
| Access Restrictions Note | Optional | Note the specific access restrictions. | There are restrictions on this collection until 2034. |
| Use Restrictions? | Optional | Check if use restrictions are known. | |
| Use Restrictions Note | Optional | Note use restrictions. | Patrons cannot make scans of the materials due to copyright. |
Dates
The Dates section in the Accession Record is used to document the dates of the materials in the accession. Include both bulk and inclusive dates when appropriate. Please consult with department colleagues if questions arise.
| Field | Required | Content | Examples |
|---|---|---|---|
| Label | Yes | Select what the date type is from this drop-down menu. Generally, Creation is selected. Consult a colleague if you think it should be something different. | Creation; Modified; Digitized |
| Expression | Yes | This field shows the dates that are visible in the accession record. More descriptive information can be included in this field, such as circa. | 1942-1987; circa 1985; 05 June 1947 |
| Type | Yes | Select inclusive, bulk dates, or single from drop-down menu. | Inclusive = dates encompass whole collection; Bulk = majority of materials are between two dates; Single = for material that only covers one date |
| Begin Date | Yes | First date in date range (yyyy-mm-dd). | May 25, 1947 would be 1947-05-25 |
| End Date | Yes | Last date in date range (yyyy-mm-dd). If using single date in Type field, do not include an end date. | |
| Certainty | Optional | Are these circa dates? If so, choose Approximate. If not, leave blank. |
Era and Calendar autopopulate as CE and Gregorian respectively; generally no need to adjust.
Extents
The Extents section in the Accession Record refers to the size of the collection (usually # of cubic feet, i.e. # of bankers boxes). Always record Extent for accessions - this is a required element.
| Field | Required | Content | Examples |
|---|---|---|---|
| Portion | Yes | Normally, Whole is chosen because it describes entire collection. However, Part can be chosen is there are varying extents. Can be added multiple times. | Physical or born-digital collection without variations = Whole; Hybrid collection with analog materials in boxes and assets on a USB drive = Part |
| Number | Yes | The numeric value of the extent. | Physical collection = Whole, 5 (cubic feet); Hybrid collection = Part, 2 (c.f.) & Part, 15 (megabytes) |
| Type | Yes | Choose best option. Most often will be cubic feet. For digital collections it may be Megabytes, Gigabytes, or Terabytes. | Physical collection = Whole, 5, cubic feet; Born-Digital collection = Whole, 5, gigabytes OR Whole, 5, computer disks; Hybrid collection = Part, 42, cubic feet & Part, 27.5, megabytes |
| Container Summary | Optional | Use this field to track number of boxes and as a guide to see if boxes are missing from a shelf. | 4 folders, 1 bankers box, 2 document boxes |
| Physical Details | Optional | Other physical details of the materials described. | Analog; b&w; negatives |
| Dimensions | Optional | Dimensions of the materials described. | 29 cm; 7 in. |
Related Accessions
The Related Accessions section of the Accession Record should be filled out if you know there are other accessions that belong in the same collection.
- Select Add Related Accession.
- In the Relationship type drop-down menu, usually choose Is Sibling of.
- The language here is confusing. It has to do with hierarchies (Does an accession fall under a previous accession or is it on the same level?).
- In the Sibling Relationship box, fill out the required fields.
- This Accession = Is Sibling of
- Accession = Search for the related accession you are trying to connect to. Hint: Using the drop-down menu here to Browse might be easier when searching.
- Relator Type = Automates with “Bound With” relationship.
Instances
The Instances section of the Accession Record is used to track location of materials. If this isn’t used, just note location the User Defined section in String 1. Please consult with department colleagues if questions arise.
To add an instance:
- Scroll to Instances in Accession Record. Click on either Create Container Instance or Add Container Instance (right side of screen).
- Under Type, select the field that represents what the materials are. Best practice is to select Mixed Materials.
- Top Container is the Box level. Click the dropdown arrow and select Create.
- The Create Top Container window will pop up. Fill in the Container Type and Indicator.
- Container Type is usually Box.
- Indicator is usually a number.
- Example: Container Type: Box, Indicator: 1 will read in the Resource Record as: Box 1.
- Click the blue Create and Link to Top Container button.
- The Create Top Container window will pop up. Fill in the Container Type and Indicator.
- Select the correct Child Type from the dropdown.
- If the Top Container is a box, the best practice is to select Folder from this list (other forms from these options are acceptable).
- Child Indicator is again a numerical value.
- Example: Child Type: Folder, Child Indicator: 54 will read in the Resource Record as Folder 54.
| Field | Required | Content | Examples |
|---|---|---|---|
| Type | Yes | Drop-down menu, typically just use Accession for accession records | |
| Top Container | Yes | From drop-down menu, select best description. Usually, Box. | |
| Container Type | Optional | From drop-down menu, select Create | |
| Indicator | Yes | An alphanumeric expression for indicating the place of the highest level container, which may also be the position of the container in a sequence of containers. | Container Type = Box & Indicator = 1 so… Box 1 |
- Continue these steps until all container instances in the collection are entered.
- Save the Resource.
Locations
See Labeling and Shelving Accessions for more details.
Once Container Type and Indicator are filled in, you can Add Location if one is known.
To link location information:
- Click on the blue Top Container button, and then click View.
- A window will pop up with the container details. Click Edit.
- In the Locations field, click Add Location (to the right).
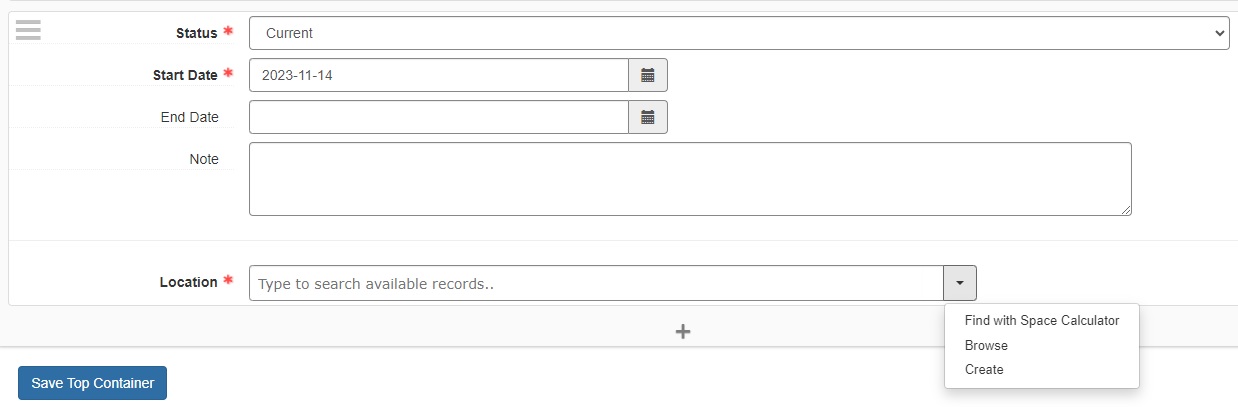
All cage locations should be in ArchivesSpace. From the dropdown menu, select “Browse.” A window with then come up and look like this:
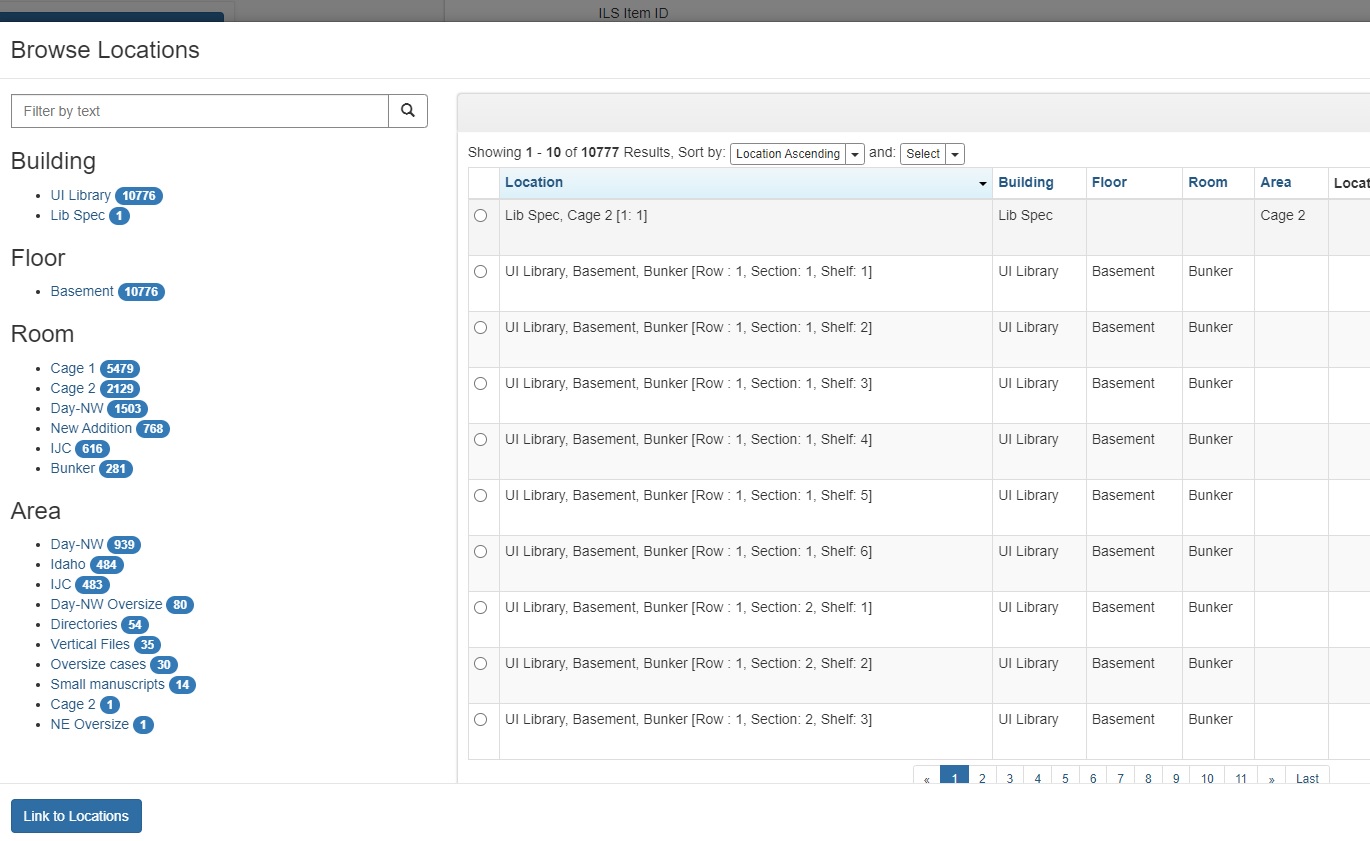
When searching for a location, filtering the result by Room is beneficial. After filtering to the area, you’re searching for, in the text box type in the row information.
- For example, if you’re putting a collection in Cage 1, in Row 113, select “Cage 1” from the Room. Then type in “113.”
- Once you find the location you need using the row, section, and shelf information you gathered, select the correct result. Then click Link to Locations. After linking, your screen will return here with the newly added location information.
Be sure to click Save Top Container. Now when you go back to the Resource Record and scroll to the Instances, the boxes will have locations attached to them.
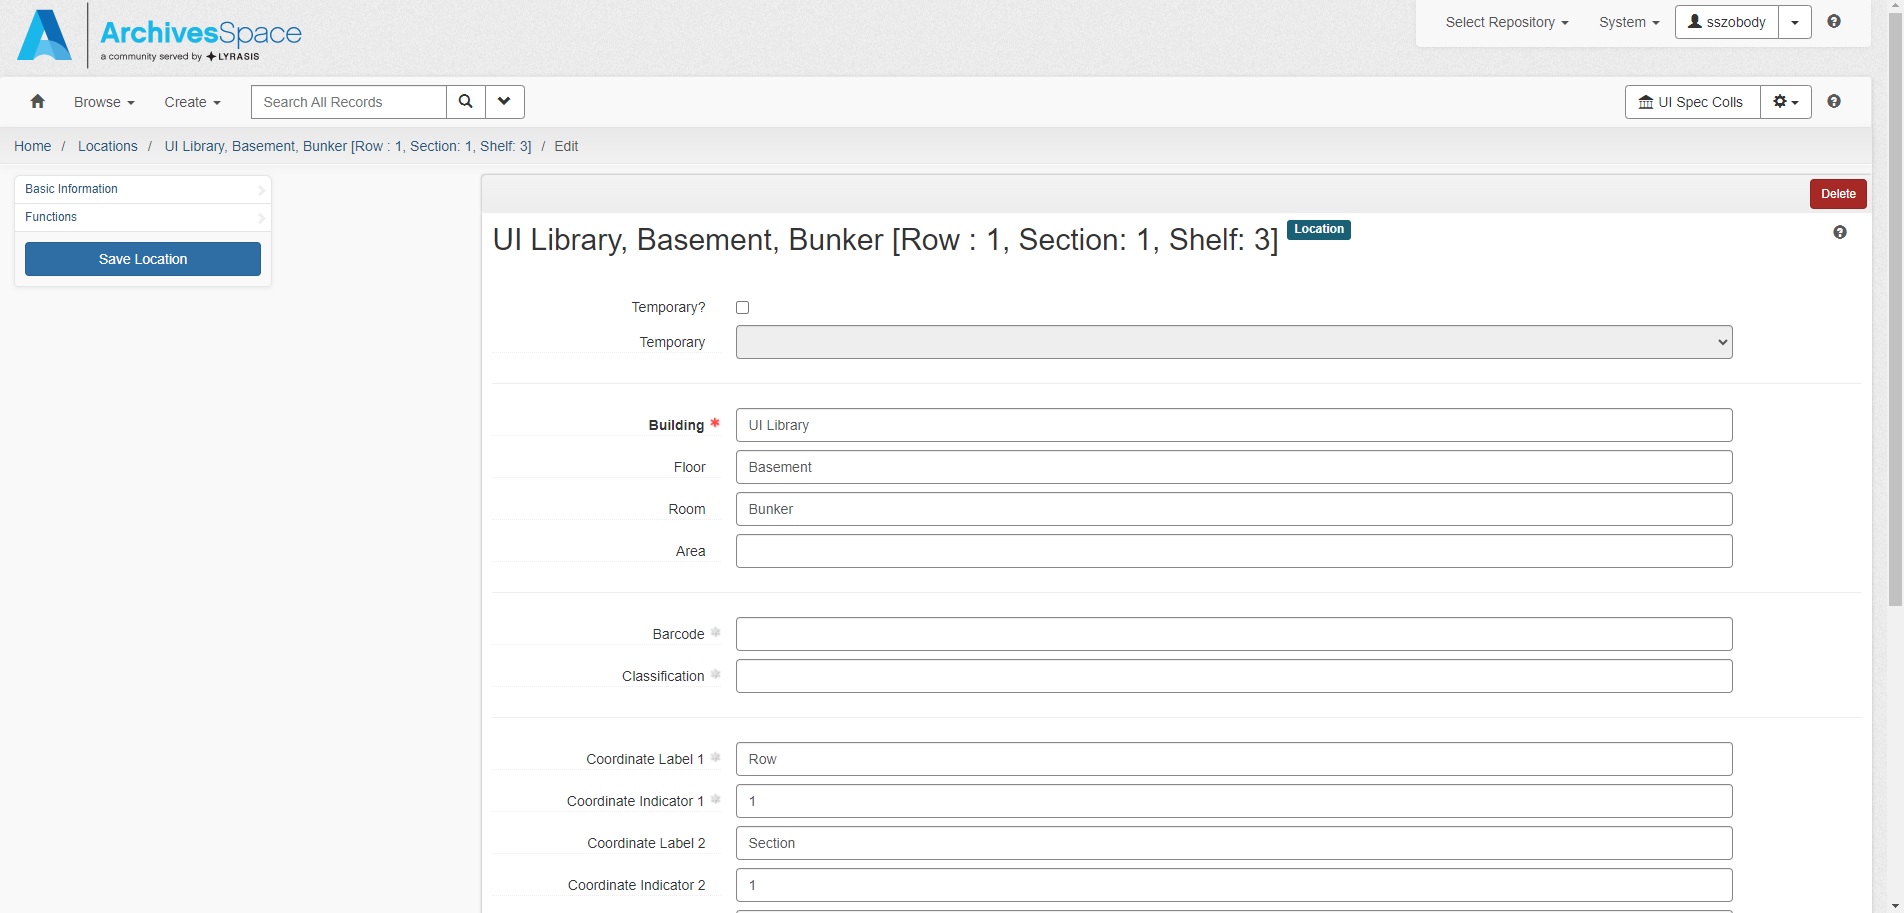
WARNING: When editing a box’s location, make sure you aren’t editing the actual location information as shown below. Changing this information doesn’t change box information, it changes the entire location record.
NOTE: If the collection is more than 10 boxes and all are in the same area, locations are needed only for a couple of boxes to indicate the shelf ranges.
Final Steps
When you are finished with the Accession Record, print it out. Go to the View screen of the record (exit Edit mode) and print from there.
Place a printed copy of the Accession Record in the appropriate binder in the processing room. Add a second copy to the first box in the accession.