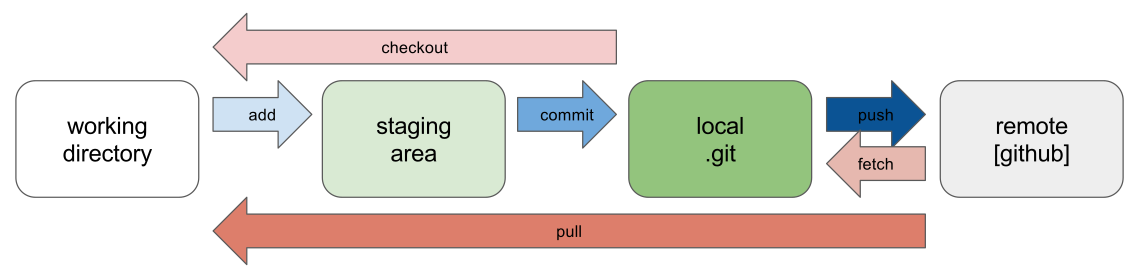
Basic Git Workflow
In general, the basic routine is:
Update your local repository with
git clone... or git pull
Edit the files locally, then
git add...

git commit...

git push...
Let’s go through the basic commands!
Always remember Git has good built in help, so add
--helpto any command to learn more.
git clone
To copy a repository from GitHub, use git clone.
Go to your GitHub repository, click the green “Clone or download” button, and copy the URL.
In your terminal, navigate to your desired location (I suggest a folder named “GitHub” in your Documents directory).
Type git clone and paste in your URL (right click or shift+Ctrl+V).
For example:
git clone https://github.com/uidaholib/gitworkshop.git
Clone will download a full copy of the repository to your local machine and record its origin on GitHub (if you get an error on Git Bash, check this note).
This ensures there is a connection so you can push your changes to GitHub or fetch updates.
Your clone has the complete history stored in the hidden .git directory.
git status
Git status is your friend. Type it often!
git status
Create a new file in your repository using a text editor, or the command line:
echo "some interesting notes" > notes.txt
Then check the status again!
git add
Once you have made changes in your repository, you need to tell Git to start tracking the file.
The function git add adds the files to the “staging area”, meaning Git is now tracking the changes.
git add notes.txt

git status
git commit
We changed a file, we added it to the staging area, and now we are ready to take a snapshot storing away these changes forever!
Let’s commit!
Each commit records a snapshot of the state of the full repository along with the name, timestamp, and message of the committer.
A message is required!
It is your note to posterity so you can remember why you made changes in the future (for style tips, see The Art of the Commit).
git commit -m "add notes file"

git status
We have stored away a new version of the documents in the repository and will be able to navigate this history. Make many smaller focused commits, rather than big ones, since small changes will be easier to undo, review, and merge.
The
-mflag adds the message on the command line. If you do not include a message, Git will open your default text editor and wait for you to enter and save a message.
Repeat!
You will use add, commit, and status over and over!
Git add fills the staging area.
Git commit takes the snapshot of changes in the staging area.
Edit a file in your test repository and repeat the routine.
git add notes.txt

git commit -m "more notes"

git status
git push
Notice that git status now says “your branch is ahead of origin/master”.
Origin/master is the standard way to name the main branch of the remote repository.
We finished our changes to the repository locally, now we have to add them to the version hosted on GitHub using push.
git push origin master
git push
Push sends only the changes, so it is very efficient network use.
Review
git status

git pull

git add file.txt

git commit -m "message"

git push
Depending on your workflow, you may want to
git fetchrather thanpull.git fetch= update repository from remote.git pull=fetch+merge, i.e. update from remote and combine with local work.